Bài hướng dẫn chi tiết này sẽ giúp bạn cách cài đặt và cấu hình dịch vụ DNS trên nền tảng CentOS 7. Hướng dẫn này cũng có thể được áp dụng với hệ điều hành Red Hat Linux và Scientific Linux 7.
Chuẩn bị cài đặt DNS Server :
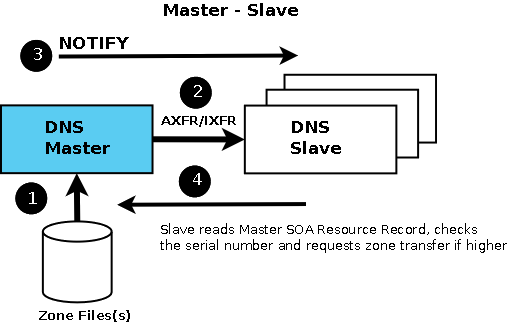
Để chuẩn bị cho bài Lab này, người viết sử dụng 3 máy. Trong đó 1 máy dùng làm DNS Server chính, hay còn gọi là DNS Server Master, 1 máy dùng làm DNS Server phụ, còn gọi là DNS Server Slave, và máy còn lại dùng làm Client.
– Máy 1 : DNS Server Master :
- Hệ điều hành : CentOS 7
- Hostname : masterdns.example.edu.vn
- IP : 192.168.1.1/255.255.255.0
– Máy 2 : DNS Server Slave :
- Hệ điều hành : CentOS 7
- Hostname : secondarydns.example.edu.vn
- IP : 192.168.1.2/255.255.255.0
– Máy 3 : DNS Server Client :
- Hệ điều hành : CentOS 7
- Hostname : client.example.edu.vn
- IP : 192.168.1.3/255.255.255.0
Cài đặt DNS Server Master :
– Trước hết cần cài đặt gói bind vào máy :
yum install bind bind-utils –y
Chỉnh sửa file cấu hình DNS Server :
– Tìm và Edit file ‘/etc/named.conf’
Bạn có thể tham khảo phần giải thích cụ thể về các thông số trong file cấu hình.
vi /etc/named.conf
– Thêm vào những dòng bôi đậm :
//
// named.conf
//

options {
listen-on port 53 { 127.0.0.1; 192.168.1.1;}; ### Master DNS IP ###
#    listen-on-v6 port 53 { ::1; };
directory     "/var/named";
dump-file     "/var/named/data/cache_dump.db";
statistics-file "/var/named/data/named_stats.txt";
memstatistics-file "/var/named/data/named_mem_stats.txt";
allow-query     { localhost; 192.168.1.0/24;}; ### IP Range ###
allow-transfer{ localhost; 192.168.1.2;};   ### Slave DNS IP ###

/*
- If you are building an AUTHORITATIVE DNS server, do NOT enable recursion.
- If you are building a RECURSIVE (caching) DNS server, you need to enable
recursion.
- If your recursive DNS server has a public IP address, you MUST enable access
control to limit queries to your legitimate users. Failing to do so will
cause your server to become part of large scale DNS amplification
attacks. Implementing BCP38 within your network would greatly
reduce such attack surface
*/

recursion yes;
dnssec-enable yes;
dnssec-validation yes;
dnssec-lookaside auto;

/* Path to ISC DLV key */
bindkeys-file "/etc/named.iscdlv.key";
managed-keys-directory "/var/named/dynamic";
pid-file "/run/named/named.pid";
session-keyfile "/run/named/session.key";
};

logging {
channel default_debug {
file "data/named.run";
severity dynamic;
};
};

zone "." IN {
type hint;
file "named.ca";
};

zone "example.edu.vn" IN {
type master;
file "forward.example";
allow-update { none; };
};

zone "1.168.192.in-addr.arpa" IN {
type master;
file "reverse.example";
allow-update { none; };
};

include "/etc/named.rfc1912.zones";
include "/etc/named.root.key";
Tiến hành tạo Zone File :
Như bạn đã thấy ở trên file ‘/etc/named.conf’, chúng ta có thêm vào vài dòng trong đó có đề cập đến 2 file Forward và Reserve :
Tạo vùng Forward Zone :
Tạo file forward.example trong thư mục ‘/var/named’ :
vi /var/named/forward.example
Thêm vào những dòng này :
$TTL 86400
@   IN  SOA     masterdns.example.edu.vn. root.example.edu.vn. (
2011071001  ;Serial
3600        ;Refresh
1800        ;Retry
604800      ;Expire
86400       ;Minimum TTL
)
@       IN  NS          masterdns.example.edu.vn.
@       IN  NS          secondarydns.example.edu.vn.
@       IN  A           192.168.1.1
@       IN  A           192.168.1.2
@       IN  A           192.168.1.3
masterdns       IN  A   192.168.1.1
secondarydns    IN  A   192.168.1.2
client          IN  A   192.168.1.3
Tạo vùng Reserve Zone :
Tạo file reserve.example ở trong thư mục ‘/var/named’ :
vi /var/named/reverse.example
Thêm vào những dòng sau :
$TTL 86400
@   IN  SOA     masterdns.example.edu.vn. root.example.edu.vn. (
2011071001  ;Serial
3600        ;Refresh
1800        ;Retry
604800      ;Expire
86400       ;Minimum TTL
)

@       IN  NS          masterdns.example.edu.vn.
@       IN  NS          secondarydns.example.edu.vn.
@       IN  PTR         example.edu.vn.

masterdns       IN  A   192.168.1.1
secondarydns    IN  A   192.168.1.2
client          IN  A   192.168.1.3

1     IN  PTR         masterdns.example.edu.vn.
2     IN  PTR         secondarydns.example.edu.vn.
3     IN  PTR         client.example.edu.vn.
Câu hỏi là: Nếu không khai báo các Record PTR này thì sao? Đây là câu trả lời.
Khởi chạy dịch vụ DNS Server :
systemctl enable named
systemctl start named
Cấu hình Firewall :
– Mở Port 53 trên Firewall để dịch vụ DNS có thể được thông qua :
firewall-cmd --permanent --add-port=53/tcp
firewall-cmd --permanent --add-port=53/udp
– Restart lại Firewall để thay đổi có hiệu lực :
firewall-cmd –reload
Cấu hình SELinux, Permissions, Ownership :
Chạy từng dòng lệnh theo thứ tự :
chgrp named -R /var/named
chown -v root:named /etc/named.conf
restorecon -rv /var/named
restorecon /etc/named.conf
Test thử DNS Server để đảm bảo không có lỗi
Chạy dòng lệnh để check DNS Server :
named-checkconf /etc/named.conf
Nếu dòng lệnh không có gì trả về, tức là bạn đã cấu hình đúng.
– Check Forward Zone bằng dòng lệnh :
named-checkzone example.edu.vn /var/named/forward.example
– Kết quả trả về :
zone example.edu.vn/IN: loaded serial 2011071001
OK
– Check Reserve Zone bằng dòng lệnh :
named-checkzone example.edu.vn /var/named/reverse.example
– Kết quả trả về :
zone example.edu.vn/IN: loaded serial 2011071001
OK
– Tiến hành thêm thông tin DNS Server vào file cấu hình card mạng :
vi /etc/sysconfig/network-scripts/ifcfg-enp0s3

TYPE="Ethernet"
BOOTPROTO="none"
DEFROUTE="yes"
IPV4_FAILURE_FATAL="no"
IPV6INIT="yes"
IPV6_AUTOCONF="yes"
IPV6_DEFROUTE="yes"
IPV6_FAILURE_FATAL="no"
NAME="enp0s3"
UUID="6e1232c5-7ba1-5c7d-7hr6-6548er765fcd"
ONBOOT="yes"
HWADDR="17:88:34:29:15:62"
IPADDR0="192.168.1.1"
PREFIX0="24"
GATEWAY0="192.168.1.1"
DNS="192.168.1.1"
IPV6_PEERDNS="yes"
IPV6_PEERROUTES="yes"
– Edit file /etc/resolv.conf,
vi /etc/resolv.conf
– Thêm vào địa chỉ IP của Name Server :
nameserver 192.168.1.1
Save và đóng file.
– Restart lại dịch vụ :
systemctl restart network
Test DNS Server Master:
Chạy dòng lệnh :
dig masterdns.example.edu.vn
– Kết quả trả về :
; <<>> DiG 9.9.4-RedHat-9.9.4-14.el7 <<>> masterdns.example.edu.vn
;; global options: +cmd
;; Got answer:
;; ->>HEADER<<- opcode: QUERY, status: NOERROR, id: 25179
;; flags: qr aa rd ra; QUERY: 1, ANSWER: 1, AUTHORITY: 2, ADDITIONAL: 2

;; OPT PSEUDOSECTION:
; EDNS: version: 0, flags:; udp: 4096

;; QUESTION SECTION:
;masterdns.example.edu.vn.    IN    A

;; ANSWER SECTION:
masterdns.example.edu.vn. 86400    IN    A    192.168.1.1

;; AUTHORITY SECTION:

example.edu.vn.        86400    IN    NS    secondarydns.example.edu.vn.
example.edu.vn.        86400    IN    NS    masterdns.example.edu.vn.

;; ADDITIONAL SECTION:
secondarydns.example.edu.vn. 86400 IN    A    192.168.1.2

;; Query time: 0 msec
;; SERVER: 192.168.1.1#53(192.168.1.101)
;; WHEN: SUN Dec 13 15:35:28 IST 2018
;; MSG SIZE  rcvd: 125
– Chạy tiếp dòng lệnh :
nslookup example.edu.vn
– Được kết quả trả về :
Server:        192.168.1.1
Address:    192.168.1.1#53
Name:    example.edu.vn
Address: 192.168.1.3
Name:    example.edu.vn
Address: 192.168.1.1
Name:    example.edu.vn
Address: 192.168.1.2
Vậy là DNS Server đã sẳn sàng để sử dụng. Chúng ta chuyển qua bước cấu hình DNS Server Slave.
Cấu hình DNS Server Slave
– Tại máy Secondary DNS, tiến hành chạy dòng lệnh để cài đặt gói bind :
yum install bind bind-utils –y
Chỉnh sửa cấu hình Slave DNS Server:
//
// named.conf
//


options {
listen-on port 53 { 127.0.0.1; 192.168.1.2; };
listen-on-v6 port 53 { ::1; };
directory "/var/named";
dump-file "/var/named/data/cache_dump.db";
statistics-file "/var/named/data/named_stats.txt";
memstatistics-file "/var/named/data/named_mem_stats.txt";
allow-query     { localhost; 192.168.1.0/24; };
.
.
.
zone "." IN {
type hint;
file "named.ca";
};

zone "example.edu.vn" IN {
type slave;
file "slaves/example.fwd";
masters { 192.168.1.1; };
};

zone "1.168.192.in-addr.arpa" IN {
type slave;
file "slaves/example.rev";
masters { 192.168.1.1; };
};

include "/etc/named.rfc1912.zones";
include "/etc/named.root.key";
– Khởi động dịch vụ DNS:
systemctl enable named
systemctl start named
Bây giờ thì các vùng Forward và Reserve sẽ tự động đồng bộ từ DNS Master sang DNS Slave ở thư mục ‘/var/named/slaves/’:
ls /var/named/slaves/
– Kết quả trả về sẽ được như sau :
example.fwd example.rev
– Cấu hình Card mạng để thêm vào máy chủ DNS :
vi /etc/sysconfig/network-scripts/ifcfg-enp0s3
Thêm vào các dòng bôi đậm
TYPE="Ethernet"
BOOTPROTO="none"
DEFROUTE="yes"
IPV4_FAILURE_FATAL="no"
IPV6INIT="yes"
IPV6_AUTOCONF="yes"
IPV6_DEFROUTE="yes"
IPV6_FAILURE_FATAL="no"
NAME="enp0s3"
UUID="6a9312c4-7eg3-3h7j-9873da986dfc"
ONBOOT="yes"
HWADDR="24:54:34:76:32:79”
IPADDR0="192.168.1.2"
PREFIX0="24"
GATEWAY0="192.168.1.1"
DNS1="192.168.1.1"
DNS2="192.168.1.2"
IPV6_PEERDNS="yes"
IPV6_PEERROUTES="yes"
– Mở và chỉnh sửa file /etc/resolv.conf
vi /etc/resolv.conf
– Thêm vào địa chỉ IP của Name Server :
nameserver      192.168.1.1
nameserver      192.168.1.2
Save và đóng file lại.
Cấu hình Firewall :
Cũng giống như máy DNS Master, bạn cần mở port 53 trên Firewall để DNS Service có thể đi qua :
firewall-cmd --permanent --add-port=53/tcp
– Restart Firewall bằng dòng lệnh :
firewall-cmd --reload
Cấu hình SELinux, Permission, Ownership :
chgrp named -R /var/named
chown -v root:named /etc/named.conf
restorecon -rv /var/named
restorecon /etc/named.conf
Tiến hành test DNS Server Master:
dig masterdns.example.edu.vn
Kết quả trả về :
; <<>> DiG 9.9.4-RedHat-9.9.4-14.el7 <<>> masterdns.example.edu.vn
;; global options: +cmd
;; Got answer:
;; ->>HEADER<<- opcode: QUERY, status: NOERROR, id: 25179
;; flags: qr aa rd ra; QUERY: 1, ANSWER: 1, AUTHORITY: 2, ADDITIONAL: 2

;; OPT PSEUDOSECTION:
; EDNS: version: 0, flags:; udp: 4096

;; QUESTION SECTION:
;masterdns.example.edu.vn.    IN    A

;; ANSWER SECTION:
masterdns.example.edu.vn. 86400    IN    A    192.168.1.1

;; AUTHORITY SECTION:
example.edu.vn.        86400    IN    NS    secondarydns.example.edu.vn.
example.edu.vn.        86400    IN    NS    masterdns.example.edu.vn.

;; ADDITIONAL SECTION:
secondarydns.example.edu.vn. 86400 IN    A    192.168.1.2

;; Query time: 0 msec
;; SERVER: 192.168.1.1#53(192.168.1.101)
;; WHEN: Wed Aug 28 12:35:43 IST 2018
;; MSG SIZE  rcvd: 125
Kiểm tra tiếp DNS Server Slave
dig secondarydns.example.edu.vn
Kết quả trả về :
; <<>> DiG 9.9.4-RedHat-9.9.4-14.el7 <<>> secondarydns.anninhmang.edu.vn
;; global options: +cmd
;; Got answer:
;; ->>HEADER<<- opcode: QUERY, status: NOERROR, id: 60819
;; flags: qr aa rd ra; QUERY: 1, ANSWER: 1, AUTHORITY: 2, ADDITIONAL: 2

;; OPT PSEUDOSECTION:
; EDNS: version: 0, flags:; udp: 4096
;; QUESTION SECTION:
;secondary.example.edu.vn.    IN    A

;; ANSWER SECTION:
secondarydns.example.edu.vn. 86400 IN    A    192.168.1.2

;; AUTHORITY SECTION:
example.edu.vn.        86400    IN    NS    masterdns.example.edu.vn.
example.edu.vn.        86400    IN    NS    secondarydns.example.edu.vn.

;; ADDITIONAL SECTION:
masterdns.example.edu.vn. 86400    IN    A    192.168.1.1

;; Query time: 0 msec
;; SERVER: 192.168.1.102#53(192.168.1.102)
;; WHEN: Wed Aug 20 17:05:50 IST 2014
;; MSG SIZE  rcvd: 125
– Phân giải thử tên miền :
nslookup example.edu.vn
– Kết quả trả về :
Server:        192.168.1.2
Address:    192.168.1.2#53
Name:    example.edu.vn
Address: 192.168.1.1
Name:    example.edu.vn
Address: 192.168.1.3
Name:    example.edu.vn
Address: 192.168.1.2
Cấu hình máy con Client :
Đối với tất cả các máy con, add thông tin địa chỉ IP của các máy DNS Server vào file ‘/etc/resolv.conf’
vi /etc/resolv.conf
Thêm vào :
nameserver 192.168.1.1
nameserver 192.168.1.2
Tiến hành restart lại dịch vụ mạng hoặc reboot máy để thay đổi được áp dụng.
Test DNS Server bằng máy Client :
Bạn có thể tiến hành test DNS Server từ các máy con bằng cách sử dụng các dòng lệnh :
dig masterdns.example.edu.vn
dig secondarydns.example.edu.vn
dig client.example.edu.vn
nslookup example.edu.vn
Vậy là cả 2 máy DNS Server Master và Slave đều đã có thể hoạt động. Chúc các bạn thành công.
Credit: anninhmang-edu-vn